Three German Machine Guns produced by Master Model in Poland. These are a beautiful product with exacting detail and are quite easy to assemble. Below you will find my review of these three guns.
Each of the guns are well presented in attractive packaging and include an instruction sheet for ease of assembly. These are designed to suit 1:32 scale aircraft.
With moderate modeling skills the assembly of these guns should pose no real problems. Some of the PE parts are very tiny and require a bit of deft modeling but nothing that can’t be overcome. I would highly recommend these products to any serious modeler who is looking for superb detail and scale accuracy, Master has produced a brilliant product and hopefully, in the near future, their range will extend to Allied guns.

Spandau LMG 08/15 AM 32-
Instruction sheet is very clear and easy to understand. I am using the guns from an Avis Fokker E.V kit. There are six major items plus the PE card which is enough for two guns, quality is outstanding.

This shows the comparison between the kit supplied plastic gun and the high quality brass enhancement parts. The details on the PE parts are exceptional and parts are clearly numbered.

I fitted the forward plate to the cooling jacket, to make it easier I held it in place with a narrow strip of Tamiya tape then applied a small drop of CA to each side, clean off any excess glue.

I inserted the barrel through the front plate then fitted the rear plate, make sure the barrel is straight before gluing the rear plate using a strip of tape to hole it in place.

Remove the barrel from the kit gun and sand the cut smooth and flat. Drill a 0.8mm hole into the gun block to accept the brass barrel extension, use CA to hold it in place making sure it is aligned with the gun block.

From the PE fret remove and fold part 5, fix to the gun cooling jacket using CA in the position indicated on the instructions, be sure the legs of the bracket are angled rearward.


PE part 6 is very tiny, remove and fold as instructed. It is too small to hold with tweezers so I threaded a piece of 0.1mm wire through the existing holes, I used this wire to position the part onto a very small drop of CA which has been placed on the forward section of the cooling jacket, hold in place for a few seconds then remove the wire, this is a made a little easier with magnifying glasses.


From the PE set remove part 4 and fold as instructed, part 3 can be fitted at this point if so desired. Holding the gun sight with a pair of tweezers, place it onto the front of the cooling jacket where a small drop of CA has been placed, hold for a few seconds until the glue has grabbed. Clean off any excess glue. The completed (apart from painting) guns look excellent.

Parabellum LMG 14/17 AM 32-
Very clear, easy to read instructions. There are enough parts here to make one gun with all parts well detailed. Some parts are very small and will require very careful handling.

I will be using the gun from a Wingnut Wings kit. As you can see the PE parts are detailed well and each part is numbered, removal is very easy with a sharp scalpel blade.

The barrel is a very neat fit inside the cooling jacket. Remove the plastic barrel and sand the end of the gun flat, drill a 0.8mm hole to accept the new barrel.

When fitting the new barrel make sure it is aligned properly with the gun. A drop of CA into the 0.8mm hole will hold the new barrel very well.


The remainder of the PE parts are fitted as per the instructions. The tiny PE part 3 requires some deft handling because it is so small. After folding, I inserted a piece length of 0.1mm wire through the existing holes, I used this wire to position the part onto a tiny drop of CA on the forward side of the cooling jacket, hold it for a few seconds to allow the glue to grab, remove the wire and clean up any excess CA.
Parabellum LMG 14 AM 32-

Instruction sheet is clear and easy to understand with nicely detailed drawings. There are enough parts here to make one enhanced gun.

I will be using the gun from one of the Wingnut Wings kits. Be a little careful handling the cooling jacket for this particular set, it is very thin hence a bit fragile and can be deformed without too much effort.

Making sure the top centre of the cooling jacket aligns with the top of the front plate, use a strip of tape to hold the plate in position so glue can be applied, a very runny CA is ideal. The barrel is inserted from the rear through the front plate.

Remove the unwanted barrel from the gun and drill a 0.8mm hole into the gun, add a drop of CA into the hole and fit the new barrel making sure everything is straight and aligned.

The completed gun (apart from painting) with the sight fitted. A very simple kit to put together with a very pleasing result.
www.master-


The guns were sprayed with Mr. Metal Color 212 Iron and then polished. I thinned the paint with just s tad of lacquer thinners and sprayed at 25psi, I left the guns for 4 hours before polishing.
—-

A PE set of beautifully detailed instrument bezels to suit any 1:32 scale WW1 aircraft model. These accessories will enhance any model which lacks proper instrument bezels in the kit supplied instrument panel.

The PE set is presented in a clear plastic bag with the bezels stuck to a black stiff board backing which offers great protection, the sets arrived in perfect condition.

A close up of the bezels show their incredible detail and very clean edges. They are connected to the sprue at only one point and removal is very easy with a very sharp scalpel.


These two photos show the top and bottom sections of the set, the detail can be clearly seen. There is a good selection of different bezels with over 120 included with each set. These are a must have accessory.
Well presented, very well packed for postage, the sprues are protected by a stiff backing card and the sprue is actually stuck to the card to stop any movement within the plastic bag. These are an excellent product which have been beautifully made and I would recommend these to anyone serious about making their 1:32 scale WW1 aircraft very realistic.
To purchase this product please contact John at
infoATaeroclub-


Both scales are presented in a zip lock plastic bag containing the product description with the airscale logo, the reverse side gives a detailed list of the instruments plus instructions for use. The bag has one sheet of decals for the appropriate scale plus a sheet of optically clear simulated instrument glass.

The 1:32 scale sheet contains 99 multi coloured instrument decals, they cover the most common used instruments found on most aircraft used during WW1. Each decal is separate and has very little carrier film exposed around the instrument.

The 1:48 scale sheet is the same as the 1:32 scale but naturally, with smaller instruments, but there are 156 individual instrument decals all with the same multi colour and sharp images.

I made a mock-
There has been a void in the market for good quality instruments decals for far too long, that void has now been filled with this outstanding product. The instruments are well detailed with very sharp defined lines, under a magnifying glass the digits can be read quite easily and the graduation marks evenly spaced around the instrument. These decals are extremely easy to apply and adhere well to a gloss surface, decal set solution can be used.
I highly recommend these decals to anyone wishing to make their instrument panel as realistic as possible, this is a brilliant product and will certainly enhance the appearance of any 1:32 or 1:48 scale WW1 model aircraft. Congratulations to Peter at Airscale for having the foresight and the gumption to produce these decals for an ever increasing demand in the WW1 model aircraft market.
WW1 instruments decals in 1:32 and 1:48 scale


This is an instrument panel I made to suit the Academy 1:32 Sopwith Camel F.1 kit. As you can see the bezels are brilliant, the black is painted using black printer ink which does not hide any of the beautiful detail, the natural brass is also outstanding, a small drop of CA holds them very well. The instrument faces are decals from airscale, another excellent product and the two products together make for a very realistic and easy to assemble instrument panel


Click any small picture for a larger image
This is my first attempt at figure painting but it will a good idea on how good this model is. The figure is based on an RFC WW1 pilot wearing a Sidcot flying suit and thigh length boots, he is also wearing a helmet with goggles and he is holding one glove in his gloved left hand.
The detail on this figure is very crisp and well defined, the facial features are nicely depicted as are all the folds and creases in the uniform, the fur lining is also well done.

The figure comes as four pieces, two arms, the head and the body with legs. The arms and head are easy to remove from the casting block


After giving the parts a wash in warm soapy water I attached the head and arms using five minute epoxy, the right hand fits neatly into his pocket. I sprayed the entire model with a base coat of Gunze Yellow FS33531. Painting brings out the fine detail on this kit. I decided to leave the casting block on at this stage to give me a good place to hold the figure. Very little clean up of the basic figure casting was required, just a few light seam lines.


I used Gunze 44 Flesh for the skin, this was applied after I painted a small amount of off white in the eyes and blue for the pupils. The Sidcot suit is painted with Humbrol 93 Desert Yellow and the boots with Gunze 406 Chocolate Brown with a little white added. The helmet is painted with the same paint as the boots but the leather for the goggles is done with Humbrol 62 leather. The fur is painted using Gunze 21 Off White, I finished off by painting the goggle frames with Mr. Metal Color Stainless.
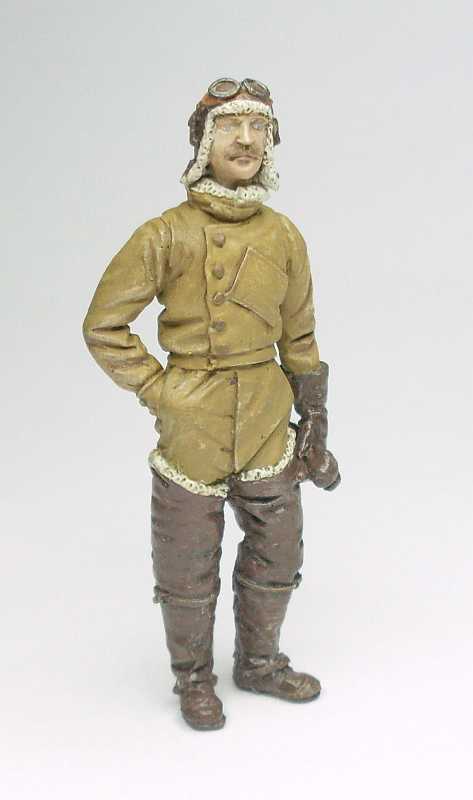


I added light highlight to the face by adding white to the flesh colour, I also used Gunze retarder to allow me more time to play around with the acrylic paint, the darker shades were done with the flesh paint with added Gunze 72 dark earth.


The moustache and eye brows were painted with Gunze 72 Dark Earth, I also painted the buttons using the same paint. I darkened the hollows of the suit creases by painting a wtery mix of the Dark Earth with retarder and water, The lighter highlights on the suit were done with the Desert Yellow with white added then dry brushed over the suit. The lips were done with Gunze 43 Wine Red with white added. The face and suit were coated with Humbrol Matt Varnish.


Photos of the completed figure posed with various aircraft types.
As I said earlier I am not a figure painter so I found this to be a bit of a challenge, but the nicely detailed and well moulded features made painting quite easy. The detail on the suit and boots is very good and the helmet and goggles are very well sculpted. The scale measures okay but in photos the head appears to be a tad large for the body.
AVAILABLE FROM:
www.a2zeemodels.co.uk
The figure is priced at £10.00 plus post.
HIGHLY RECOMMENDED