

Another beautiful kit from Wingnut Wings with superb box art. The contents fill the box completely with each sprue being individually housed in a plastic bag, then all the bags are placed within another bag. Decals are on the bottom of the box protected by their own wrapping then covered with the instruction manual which again is in it’s own wrapping. The instruction manual is a work of art with comprehensive photos of original aircraft. Instructions are clearly written and illustrated but it is important to read the instructions fully before building. A paint guide is included plus a fret of PE parts. This is a beautifully presented high quality and very well detailed kit.

Part No. D5 which are the guide pulleys for the control cables needed to be opened up to allow the cables to run behind the pulley. I drilled a 0.3mm hole but it didn’t look right, so using a very sharp No.11 scalpel blade I elongated the holes and squared off the end next to the timber support, this gives a much better look and closer to what photographic evidence shows. Painting will highlight the pulley support brackets and the pulleys themselves.

The cockpit components have been base coated using Gunze H85 Sail Color in readiness for the oil paints for the wood graining. As no two pieces of timber look the same there will be a variation in the tones. The two small pieces held by the paper clips are the control cable guide pulleys mentioned above.

While the oil paint is drying I started wrapping wire around the “wheel”. I’m using wire stripped from computer equipment, it is 0.07mm plated wire, a 180mm length does one section of the wheel. A dab of CA on each end of the wire holds it in place once the wrapping is complete. Photo on the right shows the completed wheel.

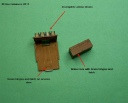
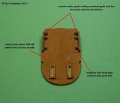
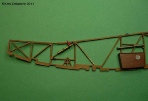
These photos show progress on the fuselage interior wood work. All the timber is done using oil paints over acrylics, they are yet to be clear coated with Humbrol Matt cote.

Instead of painting the bullet belt I cut a strip 0.5mm wide from a common tea bag. I glued thr front end onto the drum then wrapped the strip around the drum and glued the other end. Once the glue was dry I applied a small amount of water to the strip then pushed it into the bullet with my finger, this leaves the indentations between the bullets, when dry it will retain the shape. I will leave the belt the natural colour as it does look a little like linen.


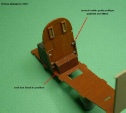
More progress photos of the fuselage interior. The fuel tank has been painted and slightly weathered, the control column and wheel are now completed, the decals have been applied to the two boxes (?) either side of the gunners position and the ammunition drums are now finished. The guide pulleys for the control cables are done but they do not line up with the hole in the bulkhead as marked by Wingnuts. The two boxes at the rear needed slots cut in the back to allow the control cables to run rearward, if this wasn’t done the cables would run in front of the boxes rubbing on the boxes. The metal cable cover/protector just above the boxes also needs to be hollowed out at the back to allow the cable to run behind. There are no indicators on the rear most bulkhead to indicate where the holes go for the control cables.


I have started to assemble the fuselage interior. The seat is now painted and fixed to the fuel tank, the auxiliary tank is also fitted. Turnbuckles have been added to the control cables with the cables being 0.12mm mono painted stainless. Control column and rudder bar are fitted. I still need to add the control cables to the control column and rudder bar
I played around with my camera and altered the settings, the colours in these four photos are more true to life, all previous photos are too red.


The control cable turnbuckles are made from 0.5mm brass tube with eyelets made from 0.13mm copper wire twisted around a 0.3mm drill bit shank, a small drop of CA holds the eyelets in place. The cable is from 0.12mm mono and the little collars are again brass tube but this time 0.4mm with a 0.3mm drilled through, once the mono has been passed through the collar a drop of CA is applied and the excess line removed. All the timber look paint is done by firstly painting everything with a base coat of acrylic, then artist oil paints are used to create the wood effect. Because there is so much timber here I used a lot of different colour oils plus oil mixes to simulate the different timbers used when building these machines. Once all the oils had dried I coated everything with a clear coat, this not only seals the paint but also stops marks on the paint which can quite easily be caused by handling


Photos of the completed interior. Seat belts are added, all six turnbuckles are fitted along with all the control cables. The observers seat is in position. The throttle quadrant has been hollowed out and is now painted and fitted. I decided to paint the bullet belts using a watered down Gunze Radome colour. Instrument panel still needs to be added.


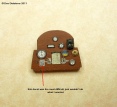
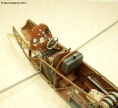
The instrument panel is nearly done. I painted the instrument bezels with Mr. Metal Color Stainless, the brass bits are painted with gold leaf and the black is Humbrol Satin Black. I sprayed it all with Humbrol Matt Cote and allowed to dry. The decals were punched from the sheet and applied with the help of a small drop of decal set, they settled down extremely well. I did have a problem with the lower left decal, it would not sit where I wanted it to go, constant manipulation was starting to cause damage so I left well enough alone. Once it is all dry, I will spray the whole panel with a clear coat to protect the decals. The second photo shows the instrument panel sitting roughly where it will eventually be positioned. The decals supplied with the kit are excellent, they are very thin, very well detailed and adhere well to the surface, congratulations must go to Wingnuts for choosing this particular decal manufacturer.


These four photos show the engine bearers and instrument panel now fixed in position. The right side of the fuselage is also attached to the fuselage interior. I completed the instrument panel by giving it a spray with Humbrol Matt Cote the I put the “glass” over the instruments by using a drop of Humbrol Gloss Cote. I have also commenced fitting the machine gun feed and exit chutes. The fuselage interior fitted perfectly inside the outer fuselage body, as with all the parts I have fitted so far, all perfect fits. Next step will be to close up the fuselage.

The fuselage has now been closed up. The two halves mated beautifully with no gaps, only a very minuscule amount of filler was needed along the bottom joint, well done Wingnuts. I painted the inside of the two coamings and the top section of the bulkhead behind the pilot seat using Gunze H21 Off White, I prefer this to a very stark full white. Once the paint was dry I applied two coats of Humbrol Matt Cote, brings it in line with the rest of the fuselage interior.


The cockpit and observers coaming have now been fitted. They positioned very well and after the glue had dried they only required a very small amount of sanding. The off white inside stands out against the darker interior, much better, I feel, than a vivid white. It’s a shame but a lot of the cockpit detail has now been hidden.

This is a dry fit of the wings, and the fit is perfect. These are large wings, they span 42cm, they make the fuselage look small. I still need to clean up all the sprue attachment points, which were quite large, then I will commence painting. I have decided to leave assembling the engine till last.

I sprayed the underside of the wing with Gunze H318 Radome, once dry I masked each side of each rib then painted Gunze H21 Off White. I removed the tape then using a 4B lead pencil I shaded each side of the white paint only applying the colour lightly, I rubbed it with my finger to feather it out. Once all completed I sprayed very light coats of the Gunze Radome continuing until the desired look was achieved, I did the elevators the same way. This method gives a lighter rib colour with a little shadowing either side of each rib, quick and easy to do.


I masked the fuselage and painted it with Humbrol No.165 Blue Grey. Both wings have
now had the pre-

I have painted the underside of the fuselage and the tailplane using Humbrol No.65 Aircraft Blue which gives a matt finish. Wingnut calls for this to be a gloss so I will spray it with a gloss clear. The underside of the elevators are also gloss so they will receive the same treatment. The join line along the bottom of the fuselage was very good but did require just a small amount of filler.


The bottom of the wings are now adorned with the decals. I sprayed a clear gloss then applied the decals, they went on beautifully. After they were dry I sprayed both wings with Humbrol Matt Cote.


I have painted the cockpit padding with Humbrol No.62 Leather, it still needs a coat of satin clear. The tail is now fitted along with the elevators and the rudder. The rudder was sprayed with Humbrol Gloss White then the decals were fitted, the rudder will be sprayed with a matt clear coat. The underside of the tailplane and elevator as well as the bottom of the fuselage have been sprayed with a gloss clear. The cockpit and observers coaming have been glossed using Humbrol Gloss Cote, I applied two coats, I also applied two coats of gloss to the top section of the rear fuselage and the tailplane and elevator in preparation for the lozenge decals.


I have now applied the lozenge decals to the rear section of the fuselage, the tailplane and the elevators. In all my years of modeling I have not used better decals than the ones supplied by Wingnuts, they are brilliant. They adhere extremely well and conform to different shapes beautifully, once placed on the surface they settle down very quickly but still allows you time for moving into the correct position. They do require trimming as they are slightly oversize for the location they are to be fitted, the elevator lozenge is quite a bit larger as they were made to suit all the different elevator designs. Once dry, I will spray the decals with Humbrol Matt Cote.


This is the completed machine gun for the observers position. The cooling jacket
and PE accessories are from the Master set AM-


I have fitted the tacho and tacho decal, the instrument was painted with Gunze gloss black. I have also trial fitted the machine gun, it is mounted to the completed gun cradle. The colour of the gun platform is a mixture of different greens, there was no specific quantities, I just kept adding until I thought it was right., it has also been coated with Humbrol Matt Cote. The brackets are painted with Mr Metal Colour Iron and lightly polished with a soft brush.


I have now applied the decals to the sides of the fuselage. As I have said before, these decals are brilliant. Because of the unusual shape of the fuselage and the irregular pattern of the decals it would be a little difficult to fix the decals in their exact positions. To overcome this I copied the decal application guide in the instruction manual, I loaded it on to my computer then resized it to be the exact same size as the model. I printed off a left and right side view then cut it out making sure the bottom of the fuselage was cut exactly right. I then cut out where the decals are to go, by placing this over the model it gives the perfect location of each decal. I removed the template and applied one decal at a time then I place the template over the model making sure the bottom of the template lined up with the bottom of the fuselage, now this shows the decal location and it was a simple matter of moving the decal until it fitted perfectly within the cut out. I did this with all the fuselage decals and they ended up as per the instructions. To stop any water soaking into the paper template I ran a couple of strips of sticky tape over the back.


One wing has now had the lozenge pattern applied, the decals went down extremely well. I have also fixed the decal to the compass mounted in the wing. The cross was applied after about an hour to let the lozenge decals dry, the cross also went on very well. I painted the aileron hinges with Mr Metal Color Iron as well as the control horn. I still need to coat the wing with a Matt cote.


This show a comparison between the two wings, one is sprayed with Humbrol Matt Cote. I have also sprayed the tailplane, top lozenge part of the fuselage and both sides of the fuselage with Humbrol Matt Cote. The lozenge decals for the wings have a very defined black edge, I don’t know if this is supposed to be there but it does stand out. The lozenge went on very well, I started from the wing root and worked out towards the wing tip, the length of the decals once I reached the wing tip was exactly right, I did not have to trim any decal from the wing tip. I did not use any decal setting solution only a little water to allow me a bit of movement, the decals settled down over the ribs extremely well. The pilot and observer fuselage coaming were left as a gloss finish. No silvering at all has appeared on any of the decals.


The wings are now fitted and Wingnuts have done a great job, the wings fitted perfectly. It has a pretty large wingspan being 42cm from wingtip to wingtip but does not look out of place amongst my other 1:32 scale WW1 aircraft models.


I have completed mounting the floats which have been painted using Humbrol No.85 Satin Black. All the struts fitted perfectly and lined up exact with all the locating holes, please heed the warning mentioned above. I sprayed the struts the same as the floats with Humbrol Satin Black, I did not put a clear coat over this paint. Once the glue was dry the float structure is very rigid and strong and supports the aircraft with ease. The aircraft sits high compared to my other models, and that is before the beaching gear is fitted. This is not one of the better looking WW1 aircraft ever built but the more I get into this kit the more I am liking the aeroplane, it has a certain likeable appeal about it and it certainly stands out when sitting with other WW1 aircraft models.


I have decided to detail the Benz BZ.III engine as much as possible. I want to add rocker arm supports so I drilled 0.3mm holes through the centre of each moulded support, I drilled down about 3mm. I then removed the moulded section but left just a small amount close to the cylinder, I sanded the are smooth where the pieces were removed. Next I need to fill the holes on the top of each cylinder so I glued the rocker and valve spring assemblies in place, once dry I removed the assemblies flush with the cylinder heads, a light sand will get it smooth and level, keep the removed sections as the rocker arms will be used. I now drilled 0.5mm holes in the top of each cylinder where the valve stems will go along with the valve springs, I drilled these holes right through the cylinder head so it makes it easier to install the valve stems. I made the valve stems from 0.5mm brass tube, it doesn’t matter about the length as it will pass through the cylinder head into the cylinder, I placed a small brass washer over the tube to act as a spring retainer, these washer are 1.15mm in diameter with a 0.6mm hole, CA holds them in place. I tightly wrapped a length of 0.18mm wire around a 0.7mm drill bit, Then I cut the “spring” to a length of 1.0mm. This spring is then placed over the brass tube and the unit inserted into the hole in the cylinder head, and there you have it, one valve spring and valve stem. The extra length on top of the brass tube is very handy for holding the assembly with tweezers or pliers for insertion into the cylinder, this will be removed once all valve spring assemblies are fixed in position.


I have fixed all the valve springs in position using CA. I cut the excess brass tube from the top of the valve springs and sanded them flat. I am modifying the rockers by cutting a slot into each one, I also drilled a 0.35mm hole in the bottom of each rocker so it will sit on the rocker support tubes. I used 0.3mm brass tube for the rocker supports and fixed them with CA. I drilled 4.5mm holes into the crank case and inserted lengths of 0.4mm brass tube for push rods, these will be adjusted and glued once the rockers are fixed in position. I have positioned the rockers just for a trial fit to see if any adjustments are needed before they are fixed permanently. This has been a lot of work so far but I believe it will be worth the effort.


The rocker assemblies are now all fixed in position, a drop of CA on top of each valve spring and on the rocker support holds them firmly in place. The push rods are fitted as a trial fit, the top of each push rod had to be flattened to allow them to fit into the small slot in the rockers.


These photos show the small levers added to the cylinders and also how I made the spark plugs, the explanation on the pictures describe well enough what I have done. The spark plugs, when installed, will look a lot better then the kit moulded plugs, the kit plugs are perfectly OK and would look good once painted, I prefer to do my own.


This series of photos show progress of the engine detailing. The spark plug leads are now fitted made from 0.13mm copper wire, I used CA to hold them in place, I then painted them with Humbrol No.118 U.S. Tan. The throttle linkage is made from left over PE fret with a 0.3mm pin to hold it to the inlet manifold, the connecting rod is a 0.4mm brass tube. I made the throttle return spring from 0.1mm wire tightly twisted then cut to length. Brass bits are painted with Mr Metal Color Brass. Spark plug insulators are painted with Gunze Off White.


This is a trial fit of the engine in the airframe, the second photo shows the radiator loose fitted. The first photo of the engine shows the exhaust pipes fitted, plumbing connected to the fuel filter and inlet manifold, magneto and plug leads on. I have added graphite to the exhaust pipes but they still need a coat of clear. I fitted the exhaust pipes using the exhaust pipe jig supplied with the kit, a brilliant addition by Wingnuts. The fuel pipes are made from 0.29mm copper wire bent to shape and inserted into pre drilled 0.3mm holes then held in place with a small drop of CA.

I have primed the beaching equipment with Gunze Radome in readiness for the oil paints to simulate timber. The propeller has also been primed using the same paint. The frame for the beaching trolley will be painted with a grey. This beaching gear is not necessary as the model sits perfectly well on the floats, but for a more authentic look the beaching gear is a great addition to the kit, perfect for those wishing to do a diorama.


The machine guns have now been fitted, I used the Wingnut supplied PE for the cooling jacket and sight. The mounting of the gun on the left side of the aircraft proved very difficult, I had to do a lot of trimming off the left side of the gun to allow it to sit upright, also the ammunition feed chute for that gun had to be trimmed back to also allow the gun to sit in an upright position, once the modifications were made the gun sat perfectly and was fixed in position. The engine is now fixed into the airframe, the locating lugs fitted very well and made engine placement very easy. The small cowling behind the engine in front of the windscreen required a bit of sanding to get it to sat flush with the mating panel, it was sitting way to high in comparison with the rest of the airframe. It was a simple matter of sanding the inside of the cowl and test fitting until it was right, the sides of this panel also sat on the ammunition chutes which stopped it sitting properly, a light sanding along these edges rectified the problem quite easily. I will be leaving the side engine cowls off this model to allow full view of the engine, it would be a shame to cover up that beautiful Benz engine.


The prop is painted along with the hub and brass tips. Copper water pipe along the top of the engine and the radiator stays are fitted, I also added the tacho drive from the back of the tacho to the engine. Radiator is fitted, still needs a few touch ups here and there.
*** WARNING ***
Because of the very close tolerances Wingnut’s have engineered into this kit, it is extremely important to remove all traces of paint from the strut locating pins and from the locating holes, if not, the fit will be tight and breakages could occur. Trial fit the struts before gluing but do not force the fit.
COMPLETED
These photos show the completed model. I added the control cables to the ailerons and rudder, the decals to the propeller and to the left side nose of the aircraft. This has been an absolute joy to build with no major headaches throughout the build. The fit of parts is excellent, sometimes a little too tight, but with care and a lot of dry fitting I had no problems. The detail on this model is superb and the decals are brilliant, another masterpiece by Wingnut Wings. This is an unusual subject and would not appeal to everyone, but now that this model is finished I have a real liking for this aeroplane, congratulations to Wingnut Wings and all involved in the development, production and marketing of this wonderful kit.


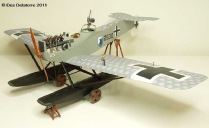

Paints and colours used during construction
Cockpit wood -
Control column wheel -
Control column -
Primer pump -
Red lever -
Control cable guide pulleys -
Control cable cover -
Upper inside fuselage -
Instrument bezels -
Cockpit padding -
Rudder -
Bottom of wings and elevators -
Underside -
Fuselage -
Floats -
Prop -
Prop hub -
Trestles, wheels for beaching -
Tyres -
Engine cylinders -
Crank case -
Radiator grill -
Matt finish -
Gloss finish -
Decal fixing -
Glue -
Control rigging -
Prop hub fixing bolts are from Grandt Line HO (1:87 scale) accessories. I used nuts from set No.5101, I have since acquired smaller nuts in set No.5100.